AWS 클라우드환경 네이티브 수업 114 일차
진행
1. xml에서 속성 추가 활용하기
2. AutoWired를 통한 속성 주입
3. Controller
요약
1. xml에서 속성 추가 활용하기
2. AutoWired를 통한 속성 주입
3. Controller
xml에서 속성 추가 활용하기
package com.edu.di.coffeeshop.coffee6;

public interface Americano {
	public String getName();

	public int getPrice();
}
package com.edu.di.coffeeshop.coffee6;
public class HotAmericano implements Americano {
@Override
public String getName() {
// TODO Auto-generated method stub
return "뜨거운 아메리카노";
}
@Override
public int getPrice() {
// TODO Auto-generated method stub
return 1500;
}
}package com.edu.di.coffeeshop.coffee6;
public class IceAmericano implements Americano {
@Override
public String getName() {
// TODO Auto-generated method stub
return "차가운 아메리카노";
}
@Override
public int getPrice() {
// TODO Auto-generated method stub
return 2000;
}
}// Coffee.java
package com.edu.di.coffeeshop.coffee6;
//===========================================
// setter 메서드를 통한 주입
//===========================================
public class Coffee {
private Americano americano;
public void setCoffee(Americano ame) {
americano = ame;
}
public void setPrice(Americano ame) {
americano = ame;
}
public String coffeeType() {
return americano.getName();
}
public int coffeePrice() {
return americano.getPrice();
}
}<!-- ApplicationContext.xml -->
<?xml version="1.0" encoding="UTF-8"?>
<beans xmlns="http://www.springframework.org/schema/beans"
xmlns:xsi="http://www.w3.org/2001/XMLSchema-instance"
xsi:schemaLocation="http://www.springframework.org/schema/beans http://www.springframework.org/schema/beans/spring-beans.xsd">
<bean id="hot" class="com.edu.di.coffeeshop.coffee6.HotAmericano"/>
<bean id="ice" class="com.edu.di.coffeeshop.coffee6.IceAmericano"/>
<!-- HotAmericano hot = new HotAmericano(); -->
<!-- IceAmericano ice = new IceAmericano(); -->
<bean id="coffee" class="com.edu.di.coffeeshop.coffee6.Coffee">
<property name="coffee" ref="ice"></property>
</bean>
<!-- <property name="coffee"
setCoffee() 메서드에서 property name을 분리해서 가져온다.
Coffee.java에서 set + Coffee => Coffee => coffee
고로, 첫 글자만 소문자로 변환 시킨다.
나머지는 대소문자 구별함.
ref="" : 주입받을 bean의 이름(ice, hot)
Coffee exam = new Coffee();
exam.setCoffee(new HotAmericano());
-->
</beans>아래의 getBean 1항과 동일한 id를 가진 bean을 위의 ApplicationContext.xml 파일에서 실행한다.
coffee의 클래스 파일은 Coffee.java이다.
그 후 Coffee.java 파일에서 어떤 setter 함수를 쓸 지 위의 property에서 정해준다.
property name에는 setter 함수로 사용되는 이름 중 매칭되는 이름이 들어가야 한다. (이 경우, price와 coffee)
아래의 getBean 2항은 클래스 파일 내의 getBean 1항과 매칭되는 함수의 매개변수로 들어간다.
따라서 이 예제의 ref인 ice가 들어가고 bean에서 ice라는 변수로 만든 객체가 실행되면서
해당 파일 주소가 적혀있는 java 가 실행된다.
여기서는 com.edu.di.coffeeshop.coffee6.IceAmericano
package com.edu.di.coffeeshop.coffee6;

import org.springframework.context.ApplicationContext;
import org.springframework.context.support.GenericXmlApplicationContext;

public class CoffeeShop {

	public static void main(String[] args) {

		Coffee exam = new Coffee();
		exam.setCoffee(new HotAmericano());
		System.out.println(exam.coffeeType());
		System.out.println(exam.coffeePrice());

		ApplicationContext ctx
			= new GenericXmlApplicationContext("com/edu/di/coffeeshop/coffee6/ApplicationContext.xml");

		Coffee coffee = ctx.getBean("coffee", Coffee.class);


		System.out.println(coffee.coffeeType());
		System.out.println(coffee.coffeePrice());


	}

}
AutoWired를 통한 속성 주입
package com.edu.di.car.mycar06;

public interface Tire {
	String	getBrand();
}
package com.edu.di.car.mycar06;
public class AmericaTire implements Tire {
@Override
public String getBrand() {
return "미국에서 만든 타이어";
}
}package com.edu.di.car.mycar06;
public class EnglandTire implements Tire {
@Override
public String getBrand() {
return "영국에서 만든 타이어";
}
}package com.edu.di.car.mycar06;
public class KoreaTire implements Tire {
@Override
public String getBrand() {
return "한국에서 만든 타이어";
}
}// Car.java
package com.edu.di.car.mycar06;
import org.springframework.beans.factory.annotation.Autowired;
//-------------------------------------------------------------------------------
//-------------------------------------------------------------------------------
public class Car {
//----------------------------------------------------------------------------
// 스프링을 통한 의존 주입 : @Autowired를 통한 속성 주입
//----------------------------------------------------------------------------
@Autowired
Tire tire;
public String getTireBrand() {
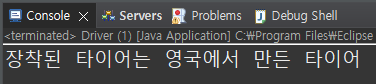
return "장착된 타이어는 " + tire.getBrand();
}
}위의 Car.java에서 Tire 타입으로 선언한 변수 tire와 일치하는 id를 가진 bean 객체를 아래 파일에서 찾아서 주입해준다.
<!-- appCtx.xml -->

<?xml version="1.0" encoding="UTF-8"?>
<beans xmlns="http://www.springframework.org/schema/beans"
	xmlns:xsi="http://www.w3.org/2001/XMLSchema-instance"
	xmlns:context="http://www.springframework.org/schema/context"
	xsi:schemaLocation="http://www.springframework.org/schema/beans http://www.springframework.org/schema/beans/spring-beans.xsd
		http://www.springframework.org/schema/context http://www.springframework.org/schema/context/spring-context-4.3.xsd">

	<!-- 자동주입(@Autowired)을 하기 위해서 기술한다. -->
	<context:annotation-config/>

	<bean id="tireA"	class="com.edu.di.car.mycar06.AmericaTire"/>
	<bean id="tire"		class="com.edu.di.car.mycar06.EnglandTire"/>
	<bean id="tireK"	class="com.edu.di.car.mycar06.KoreaTire"/>

	<bean id="car"		class="com.edu.di.car.mycar06.Car"/>

</beans>
package com.edu.di.car.mycar06;
import org.springframework.context.ApplicationContext;
import org.springframework.context.support.ClassPathXmlApplicationContext;
//-----------------------------------------------------------------------------------
// 스프링을 통한 의존성 주입 - @AutoWired를 통한 속성 주입
//-----------------------------------------------------------------------------------
public class Driver {
//-------------------------------------------------------------------------------
// public static void main(String[] args)
//-------------------------------------------------------------------------------
public static void main(String[] args) {
// 스프링 설정 파일을 읽어 들인다. => 컨테이너가 구성된다.
// 컨테이너 구성 => 설정 파일에서 <bean>으로 지정한 것이 Bean으로 등록된다.
ApplicationContext ctx
= new ClassPathXmlApplicationContext("com/edu/di/car/mycar06/appCtx.xml");
// <bean id="tireK" class="com.edu.di.car.mycar06.KoreaTire"/>
// KoreaTire tireK = new KoreaTire();
// 필요한 Bean을 가져온다.
Car car = ctx.getBean("car", Car.class);
System.out.println(car.getTireBrand());
} // End - public static void main(String[] args)
} // End - public class Driver
Controller
src → main → webapp → WEB-INF → spring → appServlet에 위치한 servlet-context.xml
에서 웹과 관련된 일을 수행한다.
아래는 해당 파일의 예시이다.
<!-- web과 관련된 역할을 수행하는 서블릿 servlet-context.xml -->

<?xml version="1.0" encoding="UTF-8"?>
<beans:beans xmlns="http://www.springframework.org/schema/mvc"
	xmlns:xsi="http://www.w3.org/2001/XMLSchema-instance"
	xmlns:beans="http://www.springframework.org/schema/beans"
	xmlns:context="http://www.springframework.org/schema/context"
	xsi:schemaLocation="http://www.springframework.org/schema/mvc https://www.springframework.org/schema/mvc/spring-mvc.xsd
		http://www.springframework.org/schema/beans https://www.springframework.org/schema/beans/spring-beans.xsd
		http://www.springframework.org/schema/context https://www.springframework.org/schema/context/spring-context.xsd">

	<!-- DispatcherServlet Context: defines this servlet's request-processing infrastructure -->

	<!-- Enables the Spring MVC @Controller programming model -->
	<annotation-driven />

	<!-- Handles HTTP GET requests for /resources/** by efficiently serving up static resources in the ${webappRoot}/resources directory -->
	<resources mapping="/resources/**" location="/resources/" />

	<!-- Resolves views selected for rendering by @Controllers to .jsp resources in the /WEB-INF/views directory -->
	<beans:bean class="org.springframework.web.servlet.view.InternalResourceViewResolver">
		<beans:property name="prefix" value="/WEB-INF/views/" />
		<beans:property name="suffix" value=".jsp" />
	</beans:bean>


	<context:component-scan base-package="com.edu.main" />

</beans:beans>
위의 코드에서 아래 쪽에 있는 코드의 경우,
WEB-INF폴더 내의 views 폴더 내의 파일들은 .jsp 형식으로 view를 보여준다는 의미.
	<beans:bean class="org.springframework.web.servlet.view.InternalResourceViewResolver">
		<beans:property name="prefix" value="/WEB-INF/views/" />
		<beans:property name="suffix" value=".jsp" />
	</beans:bean>
또한, 아래 코드를 통해 어느 패키지에 위치한 컨트롤러를 가져올지 정할 수 있다.
상위 패키지를 지정해놓으면 하위 패키지에 있는 모든 지정된 컨트롤러를 가져온다.
<context:component-scan base-package="com.edu.main" />
Controller 예시
com.edu.exam01 패키지 경로로 Controller를 예제로 만듦.
고로 아래와 같이 먼저 servlet-context.xml 에 컨트롤러 등록을 해야 함.
<context:component-scan base-package="com.edu.exam01" />
// ExamController1.java
package com.edu.exam01;
import org.springframework.stereotype.Controller;
import org.springframework.web.bind.annotation.RequestMapping;
//==============================================================
// public class ExamController1
// @Controller : 이 클래스를 컨트롤러로 설정하는 어노테이션.
// @RequestMapping("/exam1") : /exam1로 접근하는 URL을 처리하겠다는 것을 기술한 것
//==============================================================
@Controller
@RequestMapping("/exam1")
public class ExamController1 {
//==============================================================
// public void doA() : void 타입 => return 타입이 없는 경우
// localhost:8080/exam1/doA.jsp
//==============================================================
@RequestMapping("")
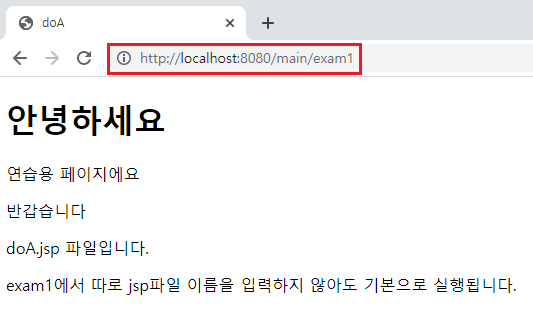
public String doA() {
System.out.println("doA가 실행되었습니다...");
return "exam1/doA";
} // End - public void doA()
//==============================================================
// @RequestMapping에 사용된 경로를 통해 실행되기 때문에
// 메서드의 이름은 중요하지 않다.
//==============================================================
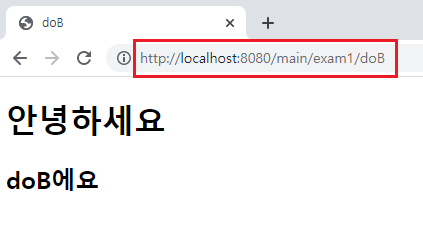
@RequestMapping("/doB")
public void doBBBBBBBBBBBBBBBBBBBBBBBBBBBBBB() {
System.out.println("doB가 실행되었습니다...");
} // End - public void doB()
} // End - public class ExamController1
<%@ page language="java" contentType="text/html; charset=UTF-8" pageEncoding="UTF-8"%>
<!DOCTYPE html>
<html>
<head>
	<meta charset="UTF-8">
	<title>doA</title>
</head>
<body>
	<h1>안녕하세요</h1>
	<p>연습용 페이지에요</p>
	<p>반갑습니다</p>
	<p>doA.jsp 파일입니다.</p>
	<p>exam1에서 따로 jsp파일 이름을 입력하지 않아도 기본으로 실행됩니다.</p>
</body>
</html>
<%@ page language="java" contentType="text/html; charset=UTF-8" pageEncoding="UTF-8"%>
<!DOCTYPE html>
<html>
<head>
<meta charset="UTF-8">
<title>doB</title>
</head>
<body>
<h1>안녕하세요</h1>
<h2>doB에요</h2>
</body>
</html>
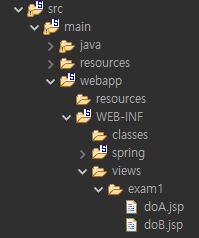
위의 jsp 파일들은 views 밑에 있는 exam1 파일에 들어가 있다.
컨트롤러에서 파라미터 값 받기
컨트롤러를 만들면 당연하게도 servlet-context.xml 에 등록을 먼저 한다.
package com.edu.exam02;
import org.springframework.stereotype.Controller;
import org.springframework.web.bind.annotation.ModelAttribute;
import org.springframework.web.bind.annotation.RequestMapping;
import org.springframework.web.bind.annotation.RequestMethod;
@Controller
@RequestMapping("/exam2")
public class ExamController2 {
//==========================================================
// return 타입이 void가 아닌 String인 경우
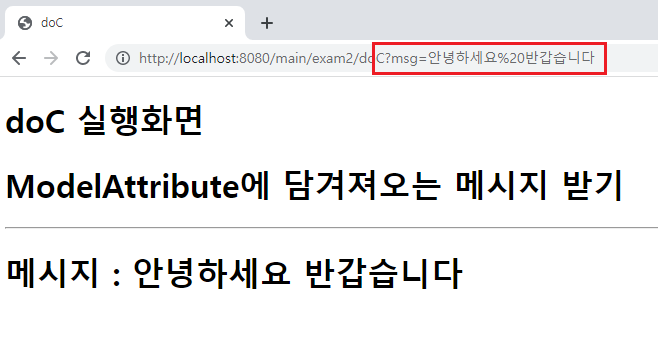
// @ModelAttribute("msg") 는 주소창에서 msg라는 파라미터의 값을 가져온다.
// http://localhost:8080/exam2/doC?msg=""
// 이렇게 주소창에 파라미터가 적혀있는 경우에 자동적으로 msg의 값을
// 가져오게 된다.
// request.getParameter("msg")를 사용하지 않아도 된다.
//==========================================================
@RequestMapping("/doC")
public String doC(@ModelAttribute("msg") String msg) {
System.out.println("doC가 실행되었습니다. msg => " + msg);
// return에 문자열이 사용될 경우에는 문자열.jsp파일을 찾아서 실행하게 된다.
// void타입과는 다르게 return타입이 String인 경우에는
// 리턴하는 문자열이 View의 이름이 된다.
return "exam2/doC";
}
}<%@ page language="java" contentType="text/html; charset=UTF-8" pageEncoding="UTF-8"%>
<!DOCTYPE html>
<html>
<head>
<meta charset="UTF-8">
<title>doC</title>
</head>
<body>
<h1>doC 실행화면</h1>
<h1>ModelAttribute에 담겨져오는 메시지 받기</h1>
<hr/>
<h1>메시지 : ${msg}</h1>
</body>
</html>
'코딩수업 > AWS 클라우드환경 네이티브' 카테고리의 다른 글
| (logger 미완)11/8 웹 제작 - RequestMapping / Inject / 로그 관리 (logger) (0) | 2022.11.18 |
|---|---|
| 11/7 웹 제작 - 롬북 / 모델 객체 / @RequestParam와 @ModelAttribute (2) | 2022.11.18 |
| 11/3 (0) | 2022.11.17 |
| 11/2 (0) | 2022.11.17 |
| 11/1 (0) | 2022.11.17 |


댓글